Family Ski Day at Camelback Mountain: A Beginner-Friendly Review with Kids
Planning a family ski trip to Camelback Mountain Resort? Read our review of skiing Camelback with beginner kids, including green trails, lift tips, rentals, food options, and family-friendly advice for a fun day on the mountain.
DAY TRIPS
3/8/20269 min read
If your kids are somewhere between “pizza slice pro” and confidently cruising green circles, this one’s for you. After a few great seasons at Spring Mountain Adventures, we could tell our kids were ready for a bigger mountain. They had outgrown the small hills and short runs, and we wanted something that would stretch their skills without overwhelming them.
Hi! 👋 I’m a mom of three kids (ages 4–11) based in Bucks County, PA, and our family is always on the lookout for trips that are actually doable — on a real budget, around a real school schedule, and with kids in tow. Think short getaways, summer vacations, and reviews from a family of five that plans carefully but still likes to have a good time.
So this year, we committed to the Triple Pass at Camelback Mountain Resort with rentals, and officially leveled up our ski season. Here’s my honest, mom-perspective review of a full family ski day at Camelback with two green-slope kids.
👉 Want to read about our time at Spring Mountain? Check out my Spring Mountain post here.
👉 And check out my post on our favorite ski and winter season clothing and gear!
The Drive from Bucks County, PA
The drive is pretty easy unless it's snowing. Let me say this: if your GPS keeps adding 20 minutes every time you glance at it… consider turning around.
Our first trip up was during fresh, light, snowfall. We are limited with the days we can go due to work schedules and other activities, so we went for it. The roads weren’t bad until we made it to the mountain, and apparently everyone decides it’s the perfect ski day when it snows. So it was bumper to bumper. In hindsight, we probably should have rescheduled. But once you’ve packed the snacks, layered the kids, and promised some good skiing, you power through.
Our next trip up was on a gorgeous, sunny, winter day, and that was smooth sailing! Made it there in an hour and half from Bucks County, PA and made a stop at Wawa for some late breakfast, so we weren’t hungry as soon as we arrived. It's always great to arrive with a full belly so you can hop right on the mountain after you are geared up!
When you get to the mountain, make sure to follow the signs for the Ski Area. This is a huge resort with multiple entrances for snow tubing and the resort and water park. The main entrance to the Ski Area, is down the road a bit more, but there are plenty of signs.
Parking & Tickets
Parking at Camelback Mountain Resort was actually easier than we expected, even on busy days. There are several parking lots around the base of the mountain, all within walking distance of the main lodge. Some lots are a little farther than others, but nothing felt unreasonable.
Each time we visited, there were employees directing traffic and guiding cars to open parking areas, which really took the guesswork out of figuring out where to go. On busy days when things start to fill up, that extra direction definitely helps keep things moving.
Once we parked and started gearing up, we gathered our necessities and left the rest in the car. Walking through the lot and into the lodge with all your extra stuff can get old after while, plus there are only cubby size lockers to store everything in. And as a family of 4, even the necessities can be a lot and we didn't want to pay for an additional locker with them ranging from $20-$30 each.
After gearing up, we headed into the ticketing area. Since we had already purchased our tickets online, the process was quick and easy. We simply scanned the QR code from our email confirmation at one of the ticket kiosks, and the machine printed our lift passes.
These passes are what you’ll use to access every lift, and you’ll need them again for any return visits if you purchased a multi-day or pass package — so don’t lose them!
Camelback recommends keeping your pass in an upper jacket pocket, which makes it easy for the scanners at the lift gates to read it automatically as you enter. It’s one of those small tips that makes the process much smoother once you’re heading out for your first run.
Rentals & Getting Settled
One reason we chose the Triple Pass package was the rentals were included. With growing kids, and the fact that we can only make it a few times a season, buying all new gear every year just doesn’t make sense. After costing out a few options, their Triple Pass with rentals was a great money saver.
The rental process was organized and efficient — even on a busy day. Staff helped size boots and skis, and were very knowledgeable and friendly.
After we had our skis, we grabbed a locker in the ski lesson area. It ended up being the perfect spot, indoors so we could get a break from the weather, and we didn’t have to worry about all their stuff getting wet on the ground. I would recommend leaving as much as you can in the car. Gear up at your car with your socks, snow pants, etc and bring a small bag with your extras. The large locker fit all 4 pairs of our shoes and a bag with extra gloves and socks. And that was about it.
Once we were all situated, we headed to the lifts.
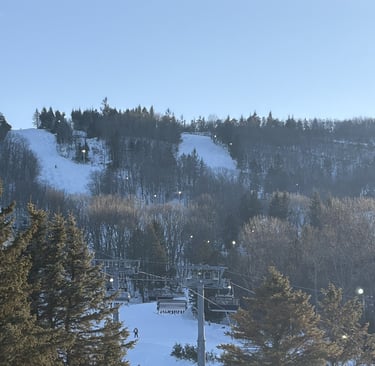
The Lifts & Getting Around the Mountain
Figuring out the lift layout was a little tricky at first. When we arrived at the base near the main lodge , there were a few lines in front of us and we wanted to make sure we were getting on a lift that would take us to the green trails.
We quickly learned that all the lifts take you to at least one green trail. Just make sure to follow the trail signs at the top to stay on them. They are clearly labeled!
This was also our first experience with the bigger, “fancier” lifts that seat up to six people across. They move quickly and efficiently, and the loading process was surprisingly easy. Before we knew it, we were headed up the mountain and at the top within just a few minutes.
Camelback has a mix of lift sizes. Some of the main lifts carry four to six people across, while a few of the smaller lifts that only go halfway up the mountain seat two riders at a time.
At first glance, some of the lines looked intimidating, but honestly they moved much faster than we expected for the number of people there. The biggest thing to be prepared for is that if you’re a smaller group, you’ll likely be filling in seats with other skiers, which is pretty typical at larger resorts. You also have to scan your lift ticket before entering the boarding area, so make sure it’s in your outside pocket or you have it easily accessible to scan.
Where to Start if Your Kids Are Still Learning
If your kids are still pretty new to skiing, I’d highly recommend starting over at Sunbowl.
On the trail map, this lift runs horizontally across the bottom of the mountain, which can make it seem like there isn’t much there. But don’t let that fool you, there is a real lift and a really great beginner area, similar to the beginner hill at Spring Mountain.
It does take a little effort to get there from the main base area. There are some flatter sections where you’ll need to shuffle along (your arms will definitely get a little workout). But once you make it over there, you’ll find a really nice bunny/beginner hill that’s perfect for warming up.
After a couple runs, you can easily connect from Sunbowl to other lifts and trails on the other side of the mountain, making it a great starting point before exploring more of Camelback.
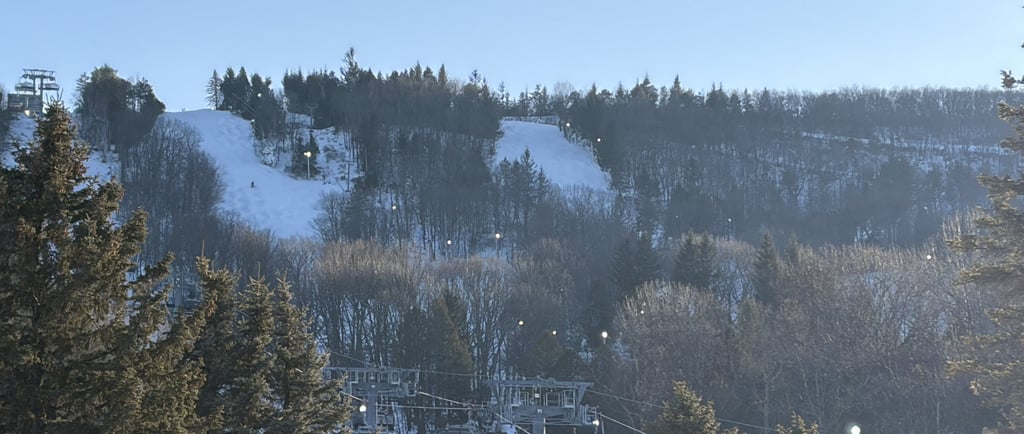
The Trails
There are plenty of green trails for beginners at Camelback, which made it a great fit for our family this season.
Most of the green runs start near the top of the mountain and wind their way down with long, gentle slopes. One of the biggest differences we noticed compared to smaller mountains like Spring Mountain was simply the length of the runs. You actually get time on your skis; time to practice turns, find your rhythm, and just enjoy the ride down the mountain.
During our visits, we managed to make it down every green trail, which felt like a pretty big accomplishment for the kids. Now they want the blues!
My personal favorites were the Caesar trails leading into Honeymoon. These runs were wide, which gave everyone plenty of space to spread out, and they had just enough slope to pick up a little speed while the kids could still stay in control. It was that perfect middle ground where they could challenge themselves without feeling overwhelmed. And they seemed to be a little less crowded than the Birches trail, possibly because you have to do the Sunbowl first and ski over to the other lifts, rather than hop on the one right in front of you at the main lodge.
Another reason I liked these trails was the sunlight. They seemed to get a little more sun compared to Birches, which made them feel brighter and a bit more enjoyable on a cold day.
Overall, the trails were well maintained and easy to navigate. There are also enough connecting paths and smaller trails throughout the mountain that you can change up your route each time you head down. It kept the day interesting and made it feel like we were exploring something new with every run.
The Food
I can’t speak to all the food options at Camelback, mostly because I have a couple of picky eaters and I wasn’t about to walk all over the lodge exploring restaurants in my ski boots.
We ended up eating in the Mountain Village area at Big Pocono On The Go. The setup there is actually pretty convenient. You swipe your card before walking in, grab what you want, and the system automatically charges you when you leave.
Inside, it’s mostly grab-and-go standard grill food, things like chicken tenders, hot dogs, pizza, burgers, drinks, and snacks. Because it’s self-service, the line moves really quickly, which is exactly what you want when everyone is cold and hungry.
The tradeoff is that the options are a little limited.
If you’re looking for something beyond basic ski-day food, there are a few other options nearby. Inside the same area there’s also an Italian take-out counter with pizza and meatball sandwiches, plus a food truck outside. There are additional restaurants on the other levels of the lodge as well, we just didn’t venture that far this trip.
The food we grabbed from the to-go area was good, nothing amazing, but exactly what you’d expect at a ski resort. Quick, kid-friendly, and a little overpriced. Next time though, I might leave the kids happily eating their chicken tenders and pizza while I go explore the other food options for something a little different.
One thing Camelback definitely does well is space. There’s a large seating area in the lodge, and tables outside if it isn’t too cold. So even on a busy day we were able to find a table and sit down to warm up and enjoy a break before heading back out to ski.
Tips for a Family Ski Day at Camelback
1. Try to ski on a weekday if you can
Camelback can get busy, especially when there’s fresh snow or on weekends. If your schedule allows, a weekday visit will usually mean shorter lift lines and a more relaxed pace. If weekdays aren’t possible, early morning skiing or night skiing can also be a great way to avoid the biggest crowds.
2. Don’t give up on finding a locker
Lockers are located in several spots around the mountain. The ones right outside the rental shop or ticketing area tend to fill up quickly, but keep looking. We found additional lockers near the food areas and inside the ski lessons building. It’s worth taking a few extra minutes to check around.
3. Bring snacks and water
Food at ski resorts tends to be pricey, and Camelback is no exception. Packing a few snacks and water bottles can help keep everyone fueled throughout the day, and save you a little money too. It’s especially helpful for kids who need quick breaks between runs.
4. Keep exploring
Camelback is a pretty big mountain, and that’s just the ski area. The resort also includes tubing and an indoor water park, so there’s a lot happening around the property. On the ski side, there are plenty of connecting trails, which makes it fun to try new routes and mix up your runs throughout the day.
The more you explore, the more the mountain starts to make sense, and the more fun the day becomes.
Final Thoughts: From Small Hill to Real Mountain
Moving from Spring Mountain to Camelback felt like a big step for our family, and it was the right one.
If your kids are confidently skiing greens but need longer runs and a bit more challenge, Camelback is a fantastic next level.
Was the first hour chaotic while we figured things out? Yes.
Did the kids leave proud of themselves for conquering larger trails? Absolutely.
If you’re in that in-between stage - not beginners, not advanced - Camelback might be exactly the mountain that grows with your family. 🏔️
Compass and Crumbs
© 2025. All rights reserved.